Wednesday, January 1, 2014

Cast Iron Resotration

In the last year, I've tried my hand at restoring some cast iron cookware. I soaked in oven cleaner, then in vinegar, then reseasoned the pans. I had great success and I now have several frying pans, a griddle and a crispy-corn-stick pan that look like new.

But being a pagan spirit, I've always had a certain draw to the cauldron. It represents the community pot from which the tribe is fed. I is a doorway for Shamans to enter into the dream world. It is a well of clean water refreshing the body and the soul.

From time to time, I check sales sites online to see if I can find cast iron pots from last century that are within driving distance. Cast Iron is far too expensive to ship if it is a large piece. When I find one that has less than a modest amount of rust, I consider the purchase.

Recently, I decided to purchase a large cauldron for myself to experiment with electrolysis removal of cast iron rust. I got most of my information here: http://www.gcica.org/ElectrolysisMethodbyJohnBelden.htm. I didn't use a large metal pot as my anode, I just used a plastic tub and surrounded the cast iron with lengths of rebar wired together. One just has to make sure the anode doesn't touch the cast iron. I bought a 10 amp battery charger (manual, not automatic) and fired up the system.

Here are some before and after photos of the cast iron.


The dark coating on the finished pot is not paint, it is seasoning. I seasoned the pot using coconut oil (the pot barely fit inside my oven).

Though I'm very happy with the results, I found that there were several things I could have done to make the results even better. I could have invested in a larger piece of metal for my anode because more surface area on the anode makes the process much faster. I really wanted a larger tub to give me more flexibility with the arrangement of anode and cathode, but I had to work with what the stores could provide. I could have bought a stronger battery charger; mine delivered a max of 10 amps, but at least 40 or more would have made the removal of rust faster and more thorough. I also found that I needed smaller wire brushes than I had to get into all of the tiny corners. This cauldron is not being used for cooking, only for spiritual use, so this is a great improvement, but one day I may strip it and rework the whole thing again.


Wednesday, March 14, 2012

A Crafty Sweep

Today's entry is about building an astral broom, also known as a besom (BEE-zum), or a witch's broom. I have built two besoms in my life so far, both of them were for myself, for use as a purification tool in ritual. I'd like to share what I have learned about the craft and the lore.

The besom is used to sympathetically sweep an area that requires purification. It can also be placed alongside your body to facilitate astral projection. The contemporary scholarship of folklore about the besom is that its knob or handle was used to apply a hallucinogenic topical into the mucous membranes of the vagina to facilitate an altered state of consciousness - hence "flying" on the broom. Though this claims has lots of academic backing, it has no direct scholarship. It is nonetheless asserted by many modern pagans as fact and is becoming understood by many folklorists as history.

Another use is to ride the broom like a hobby horse during fertility rituals. Hereditary witches claim that jumping while astride the besom has been an element of spring fertility rituals since the dark ages. The idea is that you show the grain how high to grow with the height of your jump.

When building a besom, you can choose to go after the traditional woods. Traditionally the stick is made of ash, the bristles are made of birch and the binding is made of willow. You may find birch branches at a larger floral shop or garden center for use in making wreaths. I got mine from my back yard. Willow is the same wood as wicker, so you might find the binding in a store that supplies basket-weavers. Good luck on the ash. I'm told that some home improvement stores sell ash dowels, but they are turned to be smooth and don't have the natural look of a branch. I prefer my broom to have a scraggled, rustic and homemade look rather than a neat, organized, and manufactured appearance. Ultimately, your tool is only as powerful as your belief in it. So don't stress out if you can't find the specific woods.

When I make mine, I use a birch branch because that's what came down with the bristles. The best bristles are those with some sap still in them. That means the branch recently fell and hasn't dried out, or the bristles have been factory cured so they are not brittle. If you just pick up twigs from the ground, you will likely have brittle twigs that will break apart when the pressure of the binding pushes on them. For the binding, I use cotton cord or some other strong natural twine like jute or hemp. Don't be afraid to break with tradition and make it your own.

First you must trim all of your twigs from the branches. Trim the twigs at the base of every fork so you get long, straight twigs. The best way to keep them from getting all over and ensure that they all stack at the same level is to put them into a coffee can as you cut them. When you have cut enough you can apply them to your broom stick. I like to start by gathering up the bundle and tying a loose string around it to corral them together.

You will apply the bristles to the small end of the broom stick. This seems incorrect because of the liklihood that the bristles would slide off. But if you make your stick correctly and tie the bristles tightly, they will not slide off. The large end of the broom stick should be rounded into a knob. The short end of the broom stick should be trimmed so that a side-branch remains to act as a projection. Trim off the side branch, but leave a sort stump. If you are lucky, your branch will have a natural bulge in it.

Withdraw your bristle from their keeper can and surround the small end of the broom stick and the small branch stump. Don't take the temporary string off just yet and try to keep all of the cut ends at the same level. Make sure your stick goes into the center of the bundle so that there aren't parts of the stick showing through the branches. Once the stick is surrounded by twigs, tightly tie the twigs above the branch stump. Leave a couple of inches of the twig bundle above the tie. Now you can tie the bristles below the broomstick to bring them all into order. Your bristles should generally point the same direction (more or less) and have a little bulge between the bindings.

When using your broom, you should also use visualization. You can imagine that the broom bristles are giving off a white smoke that fills the space with purity, much like a huge smudge stick. Another option is to imagine the space filled with a dark smoke or dust that the broom clears away when you symbolically sweep the space. Remember that you need not actually touch the floor with your broom if you don't want. The act of using the broom, coupled with your visualization, will bring about the purity of space you desire.

Wednesday, January 18, 2012

Love and Hate gum

I have come to strongly dislike the seed balls from the Sweetgum tree (Liquidambar styraciflua). They get into the grass such that the mower won't lift them out. Then I step on them and they hurt!

I usually collect them after a rain because the normally reddish color they have darkens and they really stand out against the grass. This color darkens as the balls get older. Most of the time, I toss them to the side to decompose with the rest of the leaf litter.

This time, I decided to put aside my anger and collect them as a natural bead. For your collection, get the ones that fell this year. You can identify them because they will be reddish-brown, rather than dark brown, black or gray. It is a very pretty color. The newer ones also have lots of points because no one has had time to step on them yet (I promise I'm not bitter). I was able to collect a cloth grocery bag full of them in about a half hour.

I have lots of ideas for these things. I think they would look really cool on a strand with smaller wood and bone beads as a set of earrings. Painted white, they would look fun as the trim around the edge of a natural wooden Holly King.


I know it's too late for Yule, but after trimming off the stems, I painted a few of them gold and strung them on a hemp cord to make a garland. They look great when paired with other wooden beads. I think a garland of silver sweetgum balls will look great on a tree with all white lights. I will also play around with some unpainted of course.

When stringing these up, you will need an upholstery needle, preferably one with a bladed end. The center of these things were pretty woody, so I found it easier to first pierce one side and then push the ball down onto the needle by bracing the eye of the needle down against a cutting board. Use only the very tips of your fingers pushing in between the points so you don't squish flat all of the interesting points. Finally, use needle nose pliers to pull the needle through. The stem area  has the most wood so do your best to avoid it by piercing from side to side, perpendicular to the stem.


Thursday, January 12, 2012

Candle Magic

This isn't a lesson on how to make candles or a list of candle spells. Rather, this entry is going to be all of the tips and tricks I've learned by working with candles. It discusses how to make working with candles a little less than a pain in the tookus. Anyone who has messed with wax at all knows how difficult it can be as a medium.

Quick Candles
Let's say you live in a dorm, which has restrictions about burning candles. Maybe you have a busy lifestyle and just don't have time to monitor an open flame. If you need to "Work" with a candle but need it to burn up somewhat quickly so that you don't get caught or can get on with your day, you DO have options. Let's face it, tea lights take forever to burn out.

One option is to use mini-tapers (right). These are sold in magick supply stores and online for about half of a buck each. Mini-taper holders are also available. I have tested them and found that every 7/8 inch of candle burns for about one hour, which means this thing will take about 4.5 hours to burn away. For me, that's still a long time. If you go to the Jewish section of your local food market, you may find Shabbat candles. These are about the same size as mini-tapers, but come in boxes of 72 for only about $8.00! The box says they will burn for about 3 hours. Usually, the box contains only white candles, which is the universal color for all purposes, but you can sometimes find interesting swirled designs. These are kosher, meaning they have already seen a spiritual ceremony, so make sure to cleans them before use.

The rule is that one should never do Work on a broken candle. I would agree with this, but wonder if the candle can be cut down before any working. This must be done before you even have need of a candle, because the moment you say, "I need to make this red candle shorter for my love spell," you have just put energy into both halves of the candle for love. So one day, when you are not doing any Work at all, that is the time to make up some short spell candles. Lay a candle on a cutting board and roll the candle under the edge of a sharp knife or a razor blade. Use gentle pressure until the candle is well scored and then gradually more pressure until you slice through the wick. Since one side will not have any wick exposed, you can carve a little wax off of one end, much like sharpening a pencil or whittling wood. You can now store these for later consecration with whatever purpose they may need.

If you feel off about cutting up a taper before magick, another option is the birthday candle. They are perfect for candle Work on a budget and on a tight schedule.  The standard birthday candle comes in lots of colors and burns away in a few minutes. Joke stores even sell black birthday candles (see below), which are great for baneful Work in a pinch. Be warned that birthday candles do not have a "balanced" wick, which means they may drip more than most candles, especially if the air in your room is not completely still. Check the party-sections of discount stores and you may find two sizes.

While in Wal-Mart, I found so-called "giant" birthday candles (the red candle above). In one package, I got several each of red, yellow, green and blue candles! A test showed that these burn about 8 minutes per inch so the entire candle, which is just short of 5 inches, was consumed in about 35 minutes! No one manufactures holders that are small enough to hold them. One option is to push the candle into a mound of sand (moist sand holds better). I used a bit of Sculpey and baked up a decorative holder for giant birthday candles on one side and three standard birthday candles on the other. I made the pentagram by pressing in a metal ruler and the triquetra by pressing in the cap of a pill bottle. Make the holes by pressing your candle into the clay and then giving a slight twist before extracting.

Clearing a Candle Jar or Holder
Everyone has had candle wax jammed into the crevices of a holder or jar, preventing another candle from seating correctly. It is also important to remove all traces of wax from your past magickal working to prevent contamination of the next one. If your holder is glass or metal, try putting it into the freezer for a few hours. This will make the wax brittle. Remove the holder from the freezer and allow it to naturally warm for about 15 minutes. The remaining wax should more easily separate from the holder or jar. If the opening of the jar is too small, pierce the wax puddle with the tip of a knife to break it into smaller pieces.

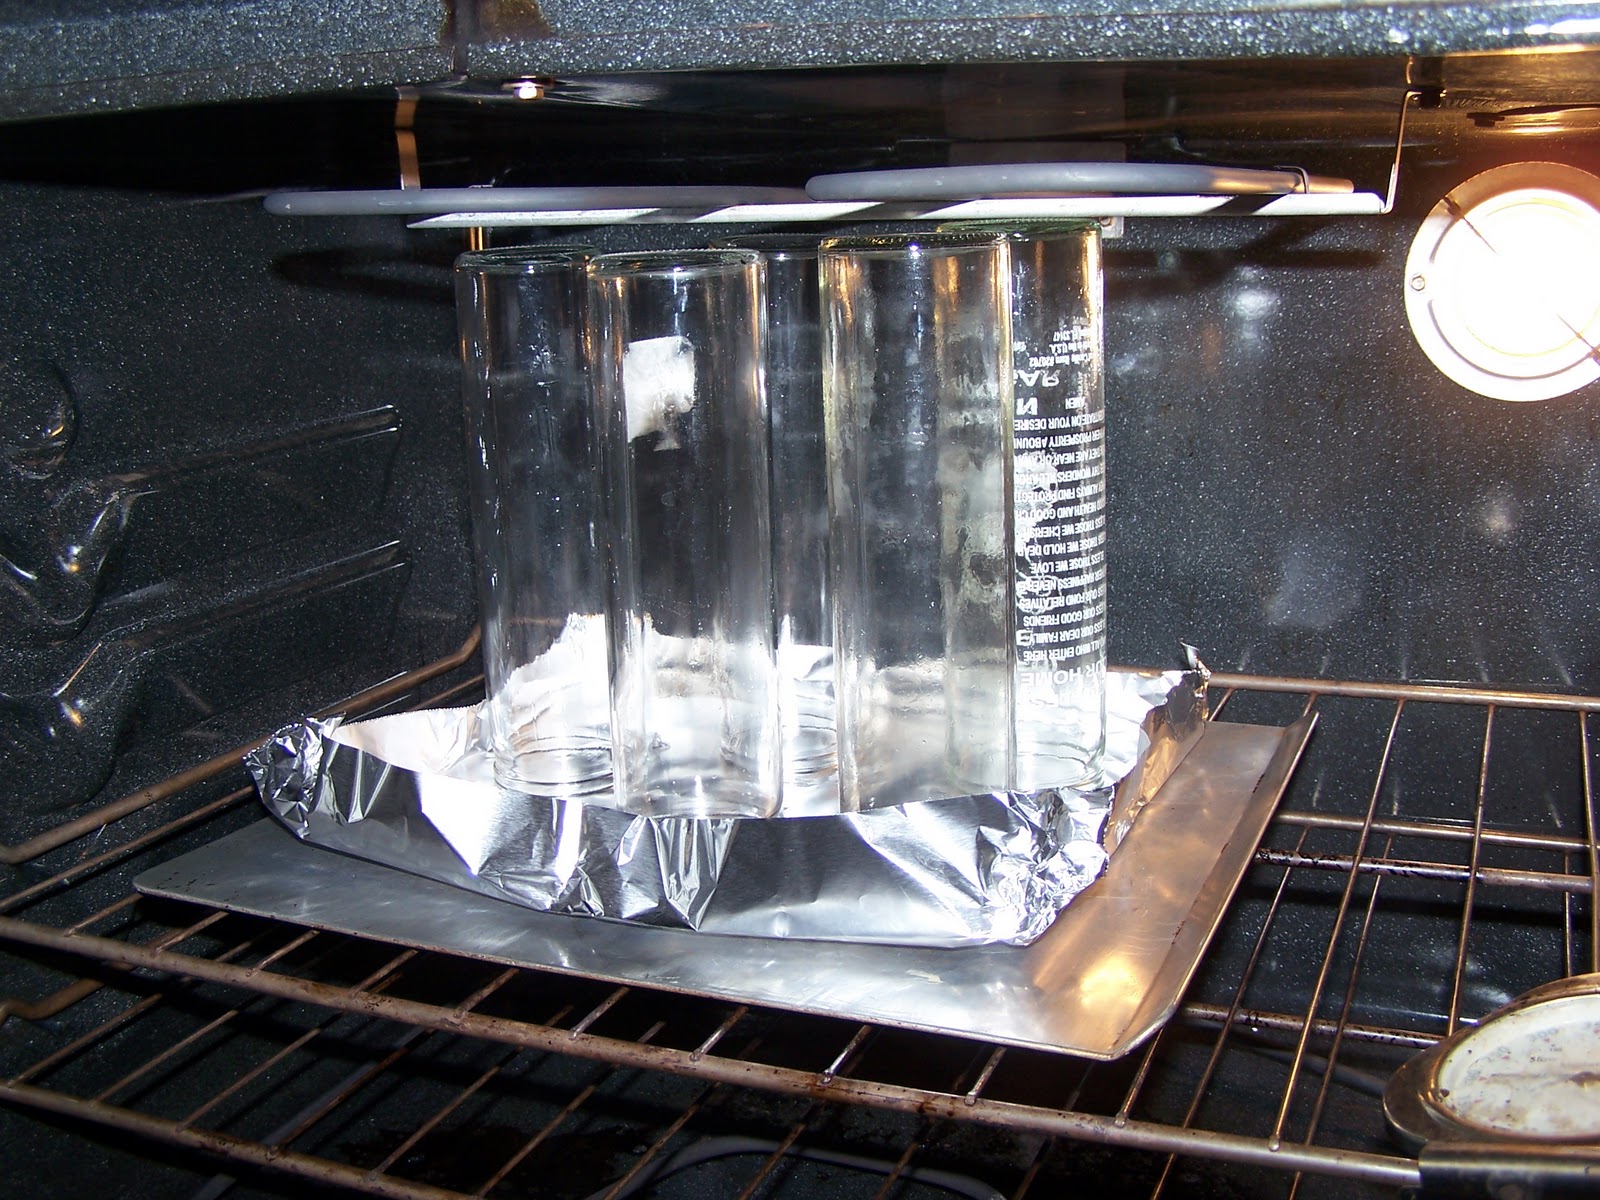
If the cold technique doesn't work for you, try the hot one. Arrange your holder up-side-down or tilted over on a foil tray in an oven set to 200 degrees. Allow the holder or jar to get hot and the wax to melt completely. Using hand protection (I use a jar opening grip-disk), wipe out the wax using a paper towel. If your jar is very deep, you can use a stick. The best stick is a paint-stir, but I also use bamboo kitchen skewers.

As a rule, I will not attempt to clean and reuse a jar that was labelled for a specific purpose or Patron unless I intend to fill it for exactly the same purpose again. (In the picture you can see a jar in the oven printed for "Peaceful Home.") In that case, specific colors, oils or herbs might be used in the making. Often my new jar candle has even more power than when I bought it!


Wax on Cloth
When wax gets onto cloth or fiber, it presents the most irritating of all conditions. Fiber works just like the candle's wick, meaning that it draws the wax along, distributing it everywhere. If your wax is very hot when you spill it, wicking is sure to happen and the fibers will get saturated before hardening. Once wax is in a fiber, it is impossible to get all of it out. No matter what you try, you can lessen it, but never remove it completely. Nonpolar solvents will dissolve wax to different degrees, but I have not tested each so I don't know how well they work. Nonpolar solvents are alcohols, kerosene, gasoline, acetone, lighter fluid, naphthalene and the like. One such solvent on the market is "Goo-Gone." I have found this actually to be be a rather expensive though small bottle of lighter fluid. Be aware that solvents may hurt your fibers, especially if they are synthetic.

The best method I've found is to chill the wax to make it brittle with an ice-pack or "canned air," then scrape away as much as possible. Once most of it is gone, sandwich the spill between two layers of paper towels and press hard on the area with a dry iron set on a low setting. This will melt the residual wax and move much of it into the towels. An oily-looking spot will remain, which may be good enough for you. If you want to try to remove the oily mark, you can try solvents at this point. Using solvents on cloth is difficult to check because you have to wash out the solvent and let the cloth dry before you can see how much it worked. It is a very tedious process.

Wax on Carpets
Most carpet spills are from up high, which allows the droplets of falling wax to cool a little and develop a skin on their way to the floor, preventing the drops from doing a lot of wicking. If your wax spill wicks into the carpet, your only option will be to chill the wax with an ice-pack or compressed air until hard and then cut away the crust by carefully separating the carpet fibers by scraping with a razor blade.

The best bet is to avoid trying to wipe up the wax until you can chill it. If you find that most of the wax did not wick into the carpet, you are lucky and you can just cut off the very tops of the effected fibers by moving a sharp razor blade parallel with the floor.

Good luck, you're going to need it.

Monday, December 12, 2011

Auto Air Freshener

This is a quick entry about a quick craft.

After sawing a slice from a 2 inch downed sapling, I used an Xacto knife to carve up a wooden air freshener for my car. I left the bark on to act as a sealer around the edges. Now I just add a few drops of my favorite essential oil or herb tincture to the center and hang it from the rear-view mirror. I've found that oils last longer and mint smells work best because menthol is easily excited at the low temperatures in cars.

Enjoy!

Tuesday, November 1, 2011

Awww, NUTS!

This month's crafty adventure centers on nuts, but I'll bet you've not had these nut before. Today we are going to figure out if we can roast and eat a wild food: beechnuts!

The American Beech (Fagus grandifolia) produces small nuts inside of a scaly covering. These scaly nut clusters drop off in Autumn and it just so happens that one of the trails I walk was full of them! Most of the time, the nuts drop out of the scales on impact with the ground, but sometimes the two remain intact. What you see here is the scale cluster surrounding the nut shell. Under the scales and then under the shell is the edible golden nut.

It took me about and hour to collect as many as you see here. I didn't weigh them before roasting because I didn't really care how much the shells weighed. Once I got them home, I used a little quality control to remove any nuts that had cracks or tiny holes in their shells. This was a sure sign of insects boring inside to the nut meat.

Since I couldn't find a recipe on roasting beechnuts, I used a peanut roasting recipe as my basis. Given that the beechnuts are much smaller than peanuts, I used the lowest temperature of all the recipes and shortened my roasting time by a little. My goal was to roast them long enough that the papery membrane between the nut shell and the nut meat would turn brittle and rub away like it does on a peanut. I also hoped that the shell itself would get a little more brittle because cracking a raw beechnut was like trying to crush granite pebbles. I ended up roasting the nuts at 325 degrees F for 20 minutes. A couple of them popped as they baked, but mostly all was quiet. The smell of them roasting was something similar to roasted hazelnuts or hickory.

When they had cooled, I tried cracking a few open. Most had nothing inside them at all! Only the very biggest nuts had any real nut inside the shell and those were very small -- about the size of a shelled sunflower seed. The 20 minutes of roasting turned them medium brown and brittle, rather than golden brown. The outer shell was so hard that I ended up using a pair of standard pliers to squeeze them open. No matter how careful I was, I could not prevent myself from pulverizing the tiny roasted nut inside.  Its possible that with a lighter roast and more care, I could produce enough nuts to make a mouthful, but overall, the yield was not worth the rather involved effort.

So, is this crafty adventure a total wash? Nope!

The nuts went back into the oven at 400 degrees F for an additional 15 minutes to really dry them out. After 5 minutes, they all started to pop! So I took them out, cooled them slightly, and started them drying again, but this time at 250 degrees F for 30 minutes. My goal wasn't to eat them but to make them decorative. They had just changed function. My first thought was that they would be great as a natural bead, because I have a prayer cord project on my slate, but they are too brittle to pierce with a needle; they break all apart. It's possible that they will work as beads if I drill tiny holes in them with my Dremel. I will test that and get back to you. But for now, pushing a needle through them makes them fall apart.

Another use could be inside a shaker; I have a gourd that is soon to be a shamanic rattle and it could use some noisy material inside. I will let you know how I use them, but rest assured that they will have a great finish.

Saturday, October 22, 2011

Home Tree Map

I very much enjoy spending time outdoors. Doing so puts my mind at peace as if I am supernaturally zapped by some Zen energy. Sometimes I go outside - even if it's blistering hot - to feel revitalized when something has kept me indoors too long. Being in my yard makes me feel spiritually connected to it. I know that a similar effect happens on a larger scale when I spend more time within my town (enjoying its event offerings and people). As I spend time in my yard, my brain comes up with fun activities for me to deepen my connection to my environment. Since I love botany, herbs and working with all kinds of plants, I knew I would have fun with this month's exercise: creating a tree map of my yard.

Of course, I started with a key or guide to the trees in my area. After moving here, I never got around to buying a local plant guide. But I'm lucky to live near all the overachievers who attend Duke University, so I was able to find some great keys through their online projects. Some of the trees were very difficult due to varietals and hybrids.


Once I knew what was growing, I started to draw it out. As I was drawing, I tried to imagine that I would have to hand this guide to someone who didn't live here who had to identify all of the trees. Even still, I'm sure the map has its confusing areas. Though I used graph paper, my drawings are not to scale. My property is wedge-shaped with a stream running down the side, so I made the front yard in landscape orientation and the back in portrait. I tried to use different colors and tree textures to show the trees since some overshadow others.

With the map finished, my next step has been assembly of a plant field guide to my yard. It only has those few plants that grow on my property, but it helps me to connect to my environment one level at a time. As I expand outward, I will begin to add entries for plants in my region of town, then to the physiographic province of my state.

When one composes a work of lore such as a local guide to plants, it is vitally important to have knowledge of the presence and an understanding of the impact of invasive species. Certainly, these species are part of nature. Certainly, they have some right to grow as they do and they can be very useful. But just as human folly allowed these species to take root in areas that permit them to function as super-beings over their comrade plants, it is up to personal human opinion whether or not one wishes to allow the continued growth of these plants.

In these situations, I ask myself these questions:
Is it abundant elsewhere?
Does it have any useful properties that would make me want it around (medicinal, incense, soil stabilization)?
Are there native plants that prefer this particular habitat (slope face, moisture level, drainage, sun/shade levels)?

My purely pagan position is this: if the plant is listed as an invasive by your local extension service, botanical society, or green smarty-pants, you can be sure that it is far from being endangered. Likely, it exists throughout your region in population densities that are detrimental to otherwise native plants. When I find a plant I don't know, I look it up and get to know it. If it has no medicinal or aromatic properties that would bribe me to nurture it or leave it alone, then I pull it up, chop it down, or spray it with killer. Losing it from my property will not endanger the plant community because my city is infested with it! What I've found is that an enormous number of other herbs begin to sprout from the seed bank in the soil. Sometimes more of the invasive plants return, attesting to their invasive nature, but more often I find new colors that have not seen sunlight for quite a long time.